
Kubernetes
This document contains installation files and instructions for deploying RegScale RegScale platform in a Kubernetes production-ready environment. Kubernetes is a preferred deployment architecture for RegScale production due to the high availability architecture, ease of upgrades, and security.
Kubernetes
If you are using Kubernetes, you first need to configure your database. A Microsoft SQL Server Database (NOTE: MS SQL Server Express is not recommended for production) is required to run ATLAS. This database should be named ATLAS to minimize any confusion later if needing RegScale support. In order to connect to the database, you will need an ADO.NET (SQL Authentication) connection string, similar to the following:
Server=tcp:{yourdatabase}.database.windows.net,1433;Initial Catalog=ATLAS;Persist Security Info=False;User ID={your_username};Password={your_password};MultipleActiveResultSets=False;Encrypt=True;TrustServerCertificate=False;Connection Timeout=30;
The connection string is stored as an environment variable within the container. It is most commonly (and securely) applied using Kubernetes Secrets or some other mechanism which are detailed below.
Pre-Requisites
- You need to have a working knowledge of Kubernetes
- Your Kubernetes cluster needs to have access to Docker Hub to pull container images: RegScale Repository
- All commands below for Kubernetes should be run in the same folder where the files were downloaded
- Links below will allow you to download the configuration files individually to run within Kubernetes or you can retrieve them from our GitHub Community Repository.
Architecture
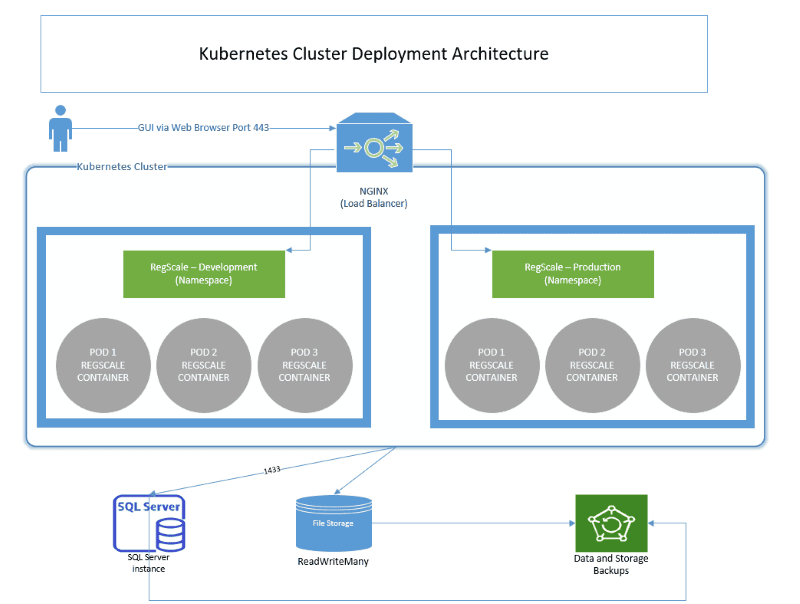
The overall components of this architecture are described below:
- NGINX - provides load balancing and SSL termination into the Kubernetes cluster
- Kubernetes Cluster - hosts the application in a highly available and scalable architecture. Most customers deploy using cloud managed Kubernetes services or on premises equivalents such as Red Hat OpenShift.
- RegScale Core Platform - Linux Docker Container that runs in multiple pods for high availability. Customers typically deploy a minimum of 3 pods and can configure auto-scaling to handle changes in load over time. This container is the core of the application and contains the Angular front end and middle tier of C# Application Programming Interfaces (APIs)
- Docker Hub - repository that contains all published releases of RegScale containers which can be pulled for installations or upgrades
- APIs - Representational State Transfer (REST) APIs that are well defined with a published Swagger interface for developing automations and integrations
- SQL Server - relational database for storing RegScale data. It is typically installed into an existing database cluster or a cloud Relational Database Service (RDS). For test and evaluation, you can also install a local SQL Server Express instance on the same VM but this is not recommended or supported for Production use.
- File Storage - RegScale allows customers to upload and encrypt evidence inside of the platform. Storage is needed to hold this data and is typically thin provisioned to allow expansion over time. This storage must support "ReadWriteMany" mode to allow multiple pods to write to the same storage.
- Backups - both the database and file storage should be routinely backed up. The container does not need to be backed up as it is immutable and stateless. Containers will be spun up and torn down on demand as needed by Kubernetes to handle load and for fault tolerance.
Deployment
-
Create a namespace for RegScale. You could deploy in your
defaultnamespace, but we recommend a dedicated namespace to avoid collisions with other applications (NOTE: If you have more than one instance of RegScale, you could create additional namespaces and deployments foratlas-dev,atlas-qa, etc.). In the examples and files below, we will useatlasas the namespace convention.-
To create a namespace, run the command:
kubectl create namespace atlas -
You can verify it is created by running the command:
kubectl get namespace -
Ensure
atlasis present
-
-
The customer must configure persistent storage that can be presented to the container. The storage must be configured to allow read/write from multiple containers which can be done in the following ways:
- Azure: Azure Files, Azure Disks, or NFS mount
- AWS: Elastic Block Store (EBS) or NFS mount using Elastic Files System (EFS)
- Local: NFS mount to the container
-
This storage should be expandable, so you can add space over time as the RegScale system grows. The commands below are very dependent on the customer environment. Below, we cover the most common scenarios for AWS, Azure, and with local NFS (NOTE: Professional services are available for complex installs):
-
AZURE
-
Azure for Kubernetes provides two separate provisioners as part of the K8S StorageClass. Azure Disks does not support access to the storage for multiple containers at a time, so it is HIGHLY RECOMMENDED that you use Azure Files to allow load balancing across multiple containers with shared access to a common file storage system.
-
To use Azure Files, you can simply apply the StorageClass in the file azure-files-sc.yaml:
kubectl apply -f azure-files-sc.yaml- As you look at this file, there are a couple things to note:
provisioner: kubernetes.io/azure-file- This config specifies to use Azure Files which is highly recommendedallowVolumeExpansion: true- This config specifies that the volumes using this StorageClass can later be expanded to allow for additional storage later, if necessary.skuName: Standard_LRS- This is the least expensive option from Azure and is sufficient for most customer's needs as ATLAS has a low IOPs requirement.- More details here: https://docs.microsoft.com/en-us/azure/aks/azure-files-dynamic-pv
- Standard_LRS - standard locally redundant storage (LRS)
- Standard_GRS - standard geo-redundant storage (GRS)
- Standard_RAGRS - standard read-access geo-redundant storage (RA-GRS)
- Premium_LRS - premium locally redundant storage (LRS)
- As you look at this file, there are a couple things to note:
-
After the StorageClass is created, you must create your Persistent Volume Claim (PVC) with this file atlas-azure-pvc.yaml:
kubectl apply -f atlas-azure-pvc.yaml-
As you look at this file, there are a couple things to note:
ReadWriteMany- This config allows multiple pods to write to the same PVC.storageClassName: azure-file- This config is the name of the StorageClass configured above. You do not need to edit this unless you changed it in the above steps.storage: 1Gi- This is the initial amount of storage for your file store, default configuration is 1 GB but the customer may configure to meet their expected storage needs (NOTE: It is expandable later)
-
Ensure the PVC has been created:
kubectl get pvc -n atlas- As a note, running the YAML file above will automatically create the Persistent Volume.
-
-
-
AWS
-
Unfortunately AWS does not currently have a built-in storage class for Kubernetes that allows multiple pods to Read/Write to the same storage. If you have a single pod, you can use Elastic Block Storage. For multiple pods, you must use Elastic File Storage (EFS).
-
Create your EFS storage in the same VPC as your Kubernetes cluster. Only static provisioning of EFS is currently supported, so you must manually provision the storage prior to the next steps
- When creating the EFS filesystem, make sure it is accessible from the Kubernetes cluster. This can be achieved by creating the filesystem inside the same VPC as the Kubernetes cluster or using VPC peering. It is recommended to have it in the same VPC as K8s to simplify the installation.
- Permissions and settings are detailed here: https://docs.aws.amazon.com/eks/latest/userguide/efs-csi.html
-
There are two ways to utilize the storage:
-
The Amazon Supported CSI driver to leverage a StorageClass
-
Deploy the CSI Driver:
kubectl apply -k "github.com/kubernetes-sigs/aws-efs-csi-driver/deploy/kubernetes/overlays/stable/?ref=master" -
Deploy the StorageClass using this file aws-efs-csi-sc.yaml:
kubectl apply -f aws-efs-csi-sc.yaml -
Deploy the Persistent Volume (PV):
-
Edit this file atlas-aws-csi-pv.yaml and insert your
FileSystemIDkubectl apply -f atlas-aws-csi-pv.yaml
-
-
Deploy the Persistent Volume Claim (PVC) with this file atlas-aws-csi-pvc.yaml:
kubectl apply -f atlas-aws-csi-pvc.yaml
-
Direct NFS
-
Deploy the NFS Persistent Volume (PV) using this file atlas-aws-nfs-pv.yaml:
-
Edit
atlas-aws-nfs-pv.yamland insert yourFileSystemIDandRegion(copy from AWS):kubectl apply -f atlas-aws-nfs-pv.yaml
-
-
Deploy the Persistent Volume Claim (PVC) using this file atlas-aws-nfs-pvc.yaml:
kubectl apply -f atlas-aws-nfs-pvc.yaml
-
-
-
-
NFS
- Local NFS should be very similar to the Direct NFS commands for AWS, just changing the server name in atlas-aws-nfs-pv.yaml to your local server name
-
-
After you have the storage configured, you are ready to setup your unique customer settings for RegScale via the Kubernetes ConfigMap. The ConfigMap has all the configurable attributes that you need to edit for your environment. The steps for doing so are described in the section below which require updates to this file atlas-env.yaml:
- Overall Config
- namespace: This is the namespace configured above
- Default value:
atlas
- Default value:
- namespace: This is the namespace configured above
- File Configuration
- StoredFilesPath: This is the location where the persistent storage will be mounted. You should not need to change this value, unless you change the deployment
- Default value:
'/atlas/files'
- Default value:
- StoredFilesPath: This is the location where the persistent storage will be mounted. You should not need to change this value, unless you change the deployment
- FileSizeLimit: The file size limit per file in bytes. Please note the overall limit is 120 MB, even if you set this variable larger than that. This variable is optional and will be set to 100 MB by default if nothing is provided.
- Default value:
"104857600"
- Default value:
- Overall Config
-
Now deploy the ConfigMap with this file atlas-env.yaml:
kubectl apply -f atlas-env.yaml -
There is a similar configuration for Secrets, where passwords and other sensitive items are stored to prevent showing them in clear text. Secrets are stored in this file atlas-secrets.yaml
- JWTSecretKey: This is your JSON Web Token (JWT) Secret Key. This should be a 256 bit key.
- You can use any mechanism to create this key. However, it should be a 256-bit, secure key as it will be changed infrequently (or never) as it will invalidate all open sessions after being deployed.
- SQLConn: This is the SQL Connection string for the database.
- NOTE: The Kubernetes cluster/pods must have connectivity to the SQL Database. Ensure firewall rules are set to allow traffic to pass. Otherwise, the pods will not start and will crash in a loop.
- If pods are crashing, you can view the logs of a given pod using the following command:
kubectl -n atlas logs -p pod-name
- EncryptionKey: This is the encryption key used to securely store select database values. This key must be exactly 256 bits (32 characters.
- You can use any mechanism to create this key. However, it should be a 256-bit, secure key as it will be changed infrequently (or never) as it will invalidate all encrypted files after being deployed.
- WARNING: Once this key is used, it should not be changed as it can result in data becoming unreadable.
- JWTSecretKey: This is your JSON Web Token (JWT) Secret Key. This should be a 256 bit key.
-
Now deploy the Secret with this file atlas-secrets.yaml:
kubectl apply -f atlas-secrets.yaml -
Now we are ready to deploy the ATLAS container with this file atlas-deploy.yaml:
kubectl apply -f atlas-deploy.yaml-
In this file, you can scale the number of replicas of RegScale. For testing, one is fine, but at least 3 are recommended for production environments to meet high availability requirements.
- NOTE: You must deploy with 1 replica upon initial startup. You can scale up later. Having multiple replicas on initial startup will cause issues initializing the database
replicas: 1ORreplicas: 3
-
Ensure the pod or pods are running with the command:
kubectl get pods -n atlas
-
-
Now that the pods are running, we need to expose the service with this file atlas-svc.yaml :
kubectl apply -f atlas-svc.yaml-
Ensure the service is running and the IP/URL is exposed:
kubectl get svc -n atlas- Copy the IP/URL from the
EXTERNAL-IPcolumn
- Copy the IP/URL from the
-
-
Update the RegScale deploy file with the IP/URL from Step 9.
- In production, you should point a standard DNS record to this IP address
-
RegScale should now be running. Point your Web Browser to the IP/URL from Step 9 or the DNS entry created in Step 10
-
See Post-Deployment Steps for remaining actions
Click for more information on DNS, SSL, and Ingress
Notes
- In cases where your Kubernetes cluster is exposed behind a proxy such as nginx (i.e. if hosted in Rancher), you may run into issues with large uploads of catalogues due to the small default request size. To solve this issue, increase the allowed body size of API calls to up to 100 MB (i.e.
nginx.ingress.kubernetes.io/proxy-body-size = 100M)
Updated about 1 year ago