
Evidence
Evidence CLI
This CLI is able to automate the evidence collection process, create child assessments linked to the parent organizer, and post scores from the assessments to the parent organizer. (NOTE: Requires release 4.11.0 or greater.)
Init.yaml Configuration
There are three pieces of information required to use the evidence CLI:
evidenceFolder- the location of the folder containing the required documents to be tested- Example:
../evidence
- Example:
passScore- the score at which an assessment passes (whole number)failScore- the score at which an assessment fails (whole number)- any score between these pass and fail scores will be considered a
partial pass
- any score between these pass and fail scores will be considered a
The first step is to set the values for these three variables in the init.yaml file.
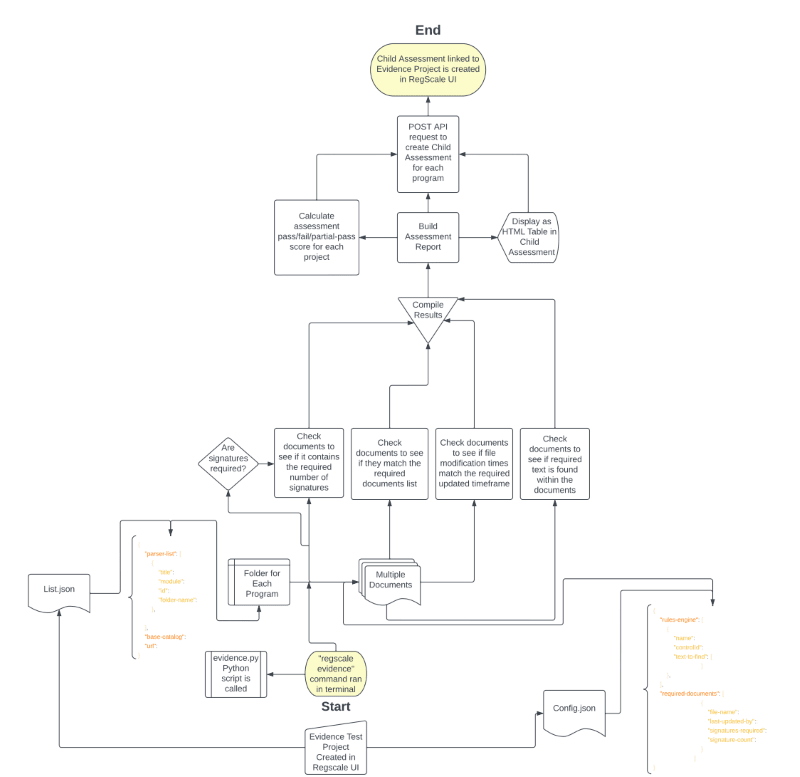
Process Overview
The below flowchart shows the end to end process for using the evidence CLI:
Directory Setup and Required JSON Files
The second step is to ensure the directory structure is correct, the config.json and list.json files are setup correctly and the required .docx or .pdf documents are present in the project folders.
Directory Structure
- Parent Level Folder
../evidence/ - Sub Folder
../evidence/security-control/ - Child Folder 1 - Corresponds to project 1
../evidence/security-control/evidence-program-1 - Child Folder 2 - Corresponds to project 2
../evidence/security-control/evidence-program-2 - Child Folder 3 - Corresponds to project 3
../evidence/security-control/evidence-program-3
There should be a child folder for each project created in the RegScale UI and each child folder should contain the .docx or .pdf documents being tested against the established test criteria.
Config.json
There are two arrays within the config.json file:
rules-engine
a. Each control should have atext-to-findvalue set with the keywords required to satisfy the text searchrequired-documents
a. Each object should contain the following document attributes:
i.file-name- the name of the .docx or .pdf document
ii.last-updated-by- the number of days the file should have been updated by to pass the test (for example if a document should be updated annually, set to 365)
iii.signatures-required- if the document requires signatures
--------this is only for digitally signed .pdf documents ---------
iv.signature-count- (not currently used) the number of digital signatures required in the .pdf document.
{
    "rules-engine": [
        {
            "name": "Continuing Capability Check",
            "controlId": "LCSE-1",
            "text-to-find": [
                                "Program of Record",
                                "Systems Engineering Assessment Model",
                                "Life Cycle"
                            ]
        },
        {
            "name": "AF SEAM Check",
            "controlId": "LCSE-2",
            "text-to-find": [
                                "Program of Record",
                                "Systems Engineering Assessment Model",
                                "Life Cycle"
                            ]
        }
    ],
    "required-documents": [
                            {
                                "file-name": "Program Baseline.docx",
                                "last-updated-by": 360,
                                "signatures-required": true,
                                "signature-count": 3
                            },
                            {
                                "file-name": "Lifecycle Engineering Plan.docx",
                                "last-updated-by": 270,
                                "signatures-required": true,
                                "signature-count": 2
                            },
                            {
                                "file-name": "Configuration Management Plan.docx",
                                "last-updated-by": 180,
                                "signatures-required": false,
                                "signature-count": 0
                            }
                        ]
}
List.json
The "parser-list" array should have an object for each project and each project should have a corresponding title, module, id and child folder name.
title- this value should match the name of the projectmodule- this should always be "projects"id- this value should match the id of the projectfolder-name- this value should match the name of the child folderurl- this should match the domain entry in theinit.yamlbase-catalog- (not currently used)
{
    "parser-list": [
        {
            "title": "Evidence Program 1",
            "module": "projects",
            "id": 81,
            "folder-name": "evidence-program-1"
        },
        {
            "title": "Evidence Program 2",
            "module": "projects",
            "id": 82,
            "folder-name": "evidence-program-2"
        },
        {
            "title": "Evidence Program 3",
            "module": "projects",
            "id": 83,
            "folder-name": "evidence-program-3"
        }
    ],
    "base-catalog": 1,
    "url": "https://mydns.regscale.com"
}
Testing
The evidence CLI tool searches the sub-directories and child folders for the required documents and conducts the following tests:
- Do the documents exist?
- If yes, do they contain the required text?
- If yes, have the documents been updated or modified within the required timeframe
- Do the (.pdf documents only) require digital signatures?
- If yes, do the .pdf documents contain the digital signatures?
- Future release - If yes, do the .pdf documents contain the required number of digital signatures?
Please see the Evidence CLI Flow Chart to see the data flows from the required documents to the child assessment creation for more information.
Example Commands
Next, execute the command to run the automated evidence collection process as demonstrated below.
Log into RegScale to set the token which is good for 24 hours and will secure all future RegScale API calls (NOTE: You can skip this step if you are using a RegScale Service Account)
regscale login
Run the automated evidence collection process to examine the documents for the established criteria.
regscale evidence
Init.yaml Example
The following init.yaml structure is necessary:
(example/notional key structure shown below, replace with actual customer keys):
domain: https://mycompany.regscale.com
token: Bearer eyJhbGciOiJIUzI1NiIsInR5cCI6IkpXVCIsImN0eSI6IkpXVCJ9.eyJzdWIiOiJhYmVsYXJkbyJ9.b-ao0bpoc6CiJ3ygG8-XOk_gwn8BehAcuLGaPB6rlxxx
evidenceFolder: ../evidence
passScore: 80
failScore: 30
Building a Bash Script to Execute the CLI
You can execute RegScale CLI commands using scripts. These scripts could be in Bash, Python, PowerShell, etc. Below is an example Bash file (named "regscaleEvidence.sh") in Ubuntu for executing the Evidence CLI that runs the automated evidence collection process
#!/bin/sh

# Run the automated evidence collection process
regscale evidence
To execute the Bash file, run this command: /path/to/folder/regscaleEvidence.sh. You can chain together any arbitrary set of CLI commands to have them execute sequentially.
Updated over 2 years ago