
Active Directory (AD)
RegScale Active Directory (AD) CLI
The AD CLI command is used to sync users and groups from Active Directory and to create corresponding user, groups, and role assignments with RegScale. It serves two primary purposes:
- Enables management of all access to user, groups, and roles via Active Directory
- Ensures that access to RegScale is immediately granted/terminated as users are added and disabled in Active Directory
This approach has two primary benefits:
- All access is centrally managed in Active Directory for improved security and ease of management
- Eliminates manual provisioning of accounts, groups, and roles in RegScale to lower Operations and Management (O&M) labor over time
Configuring Azure Active Directory (AAD)
In order for the CLI to function properly, you must register a new application in AAD and assign the appropriate permissions. To register a new application, follow these steps:
- Log into Azure and select "Azure Active Directory"
- Under Manage on the left, select "App Registrations"
- Click the "+ New registration" button, name the application
RegScale CLI, and save the registration - Next, you must give the application the appropriate permissions
- Click "API Permissions" on the left panel
- Click "+ Add a permission" button
- Click the Microsoft Graph button and then select the
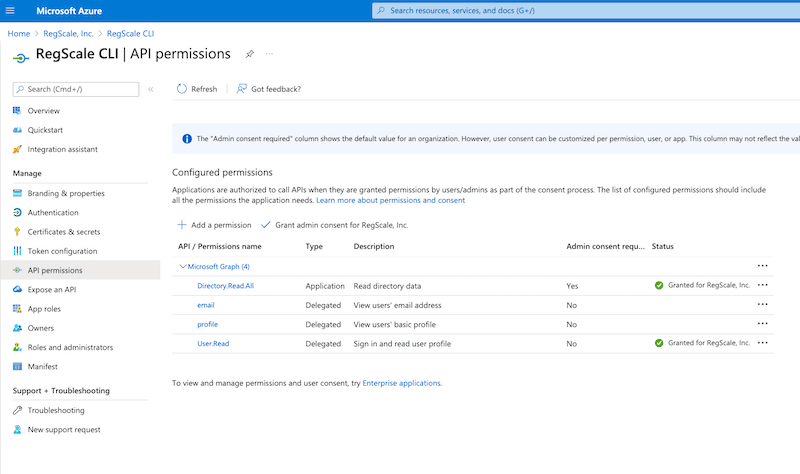
Directory.Read.Allpermission (IMPORTANT - ensure you select the "Application permissions" type and not the "Delegated permissions" type found at the top of the Microsoft Graph selection) - Click the "Grant Admin Consent" button on that page
- Next, you must generate a client secret for interactive access
- Under the "Certificates and Secrets" tab on the left panel, click the Client Secrets tab, and then click "+ New Client Secret"
- Give the secret a name and an expiration date and then click the "Add" button
- Copy the Client Secret ID and Value for later use
Once configured, your permissions should look like the screenshot below:
Updating the Init.yaml File
Once the Application Registration and secret are completed inside of AD, you must then update your init.yaml file with the following properties:
adAccessToken: nothing to manually set, leave blank. This will auto-set after authenticating to AD to get an access tokenadClientId: on the Overview tab of the Application Registration, paste the "Application (client) ID"adSecret: paste the secret created in the previous section (NOTE: This should be periodically changed and rotated for security purposes.)adTenantId: on the Overview tab of the Application Registration, paste the "Directory (tenant) ID"adAuthUrl: authentication URL (typically "https://login.microsoftonline.com/" but may vary for GovCloud and other specialized environments (i.e. "https://login.microsoftonline.us/"))adGraphUrl: Microsoft Graph URL (typically "https://graph.microsoft.com/.default" but may vary for GovCloud and other specialized environments (i.e. "https://graph.microsoft.us/.default"))
Once these settings are in place, you can test with regscale ad authenticate to ensure all settings are correct and you are able to generate an access token. If working properly, this command will auto-update your init.yaml with a new access code. NOTE: In some cases, issues have been encountered with customers who have configured Microsoft Conditional Access policies. If you are unable to connect, please check AD logs to verify and conditional access policy is not blocking the connection.
Creating Active Directory Groups
The CLI sync functions are all based on three pre-defined AD groups that you must create. These groups are as follows:
RegScale-adminRegScale-generalRegScale-readonly
Within Azure Active Directory, create these groups and then add the appropriate users to the group. This is a mandatory step for the sync CLI commands to work. Once the application registration is completed and the groups have been created, you are ready to use the RegScale AD CLI.
How to Use
Once Azure AD is properly configured, the following CLI commands are available for use:
regscale ad authenticate- logs into AD to get a temporary access code (always the first step before calling other methods)regscale ad list_groups- logs into AD and lists all groups that start with "regscale" to show the available groups to syncregscale ad sync_admins- synchronizes user accounts between AD and RegScale and ensure they are assigned the "Administrator" role in RegScaleregscale ad sync_general- synchronizes user accounts between AD and RegScale and ensure they are assigned the "General User" role in RegScaleregscale ad sync_readonly- synchronizes user accounts between AD and RegScale and ensure they are assigned the "Read Only" role in RegScale
NOTE: The CLI assigns the RegScale username based on the AD User Principal Name (UPN) by default.
Updated 17 days ago